nginx
前面
与apache使用面向进程或线程的方式处理请求不同,nginx使用异步事件驱动模型在负载下性能更突出
可以防止外网对内网服务器的恶性攻击、 缓存以减少服务器的压力和访问安全控制之外,还可以进行负载均衡,(把请求转发给给服务器,决定哪台目标主机来处理当前请求) 将用户请求分配给多个服务器
window下
window下安装非常简单,直接到官网下载,解压就可以了
这里有个服务器是window server2016,遇到了一个填坑啊,大大的冤枉.我配置好之后所有的接口404,怎么也找不到那里配置出来错误,后来发现一个奇怪的现象我把./nginx.exe -s stop, 有个fail好像说logs/nginx.pid 找不到了,具体忘了,我的理解就是nginx.exe已经关闭了.但是,偶然发现浏览器里面还能访问到页面??打开任务管理器发现一大堆nginx进程.明白了..
我stop并没有关掉进程,每次start又开启了一个进程,修改配置后reload是行不通的,必须在任务管理其中结束后重启nginx
ubuntu下安装
1. 安装nginx的依赖包
# 查看zlib是否安装
dpkg -l | grep zlib
# 解决依赖包openssl安装
sudo apt-get install openssl libssl-dev
# 解决依赖包pcre安装
sudo apt-get install libpcre3 libpcre3-dev
# 解决依赖包zlib安装
sudo apt-get install zlib1g-dev
2. 下载nginx
# 下载nginx
wget http://nginx.org/download/nginx-1.13.1.tar.gz
# 解压nginx
tar -xzvf nginx-1.13.1.tar.gz
# 重命名文件夹
mv nginx-1.13.1 nginx
cd nginx
3. 安装
#配置:
./configure --prefix=/usr/local/nginx
#编辑nginx:
make
注意:这里可能会报错,提示“pcre.h No such file or directory”,具体详见:http://stackoverflow.com/questions/22555561/error-building-fatal-error-pcre-h-no-such-file-or-directory
需要安装 libpcre3-dev,命令为:sudo apt-get install libpcre3-dev
#安装nginx:
sudo make install
命令
./sbin/nginx  #启动 Nginx

./sbin/nginx -s stop #停止 Nginx
./sbin/nginx -s quit

./sbin/nginx -s reload #Nginx重新加载配置

./sbin/nginx -c /usr/local/nginx/conf/nginx.conf #指定配置文件

./sbin/nginx -v

./sbin/nginx -t #检查配置文件是否正确
问题
注意启动权限问题 sudo
端口被占用
killall -9 nginx(先停掉nginx) 2 nginx或service nginx restart(重新启动)
代理
在nginx中配置proxy_pass代理转发时,如果在proxy_pass后面的url加/,表示绝对根路径;如果没有/,表示相对路径,把匹配的路径部分也给代理走
#第一种:
location /proxy/ {
    proxy_pass http://127.0.0.1/;
}
#代理到URL:http://127.0.0.1/test.html


#第二种(相对于第一种,最后少一个 / )
location /proxy/ {
    proxy_pass http://127.0.0.1;
}
#代理到URL:http://127.0.0.1/proxy/test.html


#第三种:
location /proxy/ {
    proxy_pass http://127.0.0.1/aaa/;
}
#代理到URL:http://127.0.0.1/aaa/test.html


#第四种(相对于第三种,最后少一个 / )
location /proxy/ {
    proxy_pass http://127.0.0.1/aaa;
}
#代理到URL:http://127.0.0.1/aaatest.html
代理例子:
upstream server1 {
    server localhost:8080;
}

location /api/ {
    proxy_pass http://server1
}
upstream 不加http:// ; location 需要添加http
均匀负载
链接多个server
upstream server1 {
    server localhost:8080;
    server localhost:8081;
}
weight 负载 权重(轮询)
upstream server1 {
    server localhost:8080 weight=3;
    server localhost:8081 weight=2;
    server localhost:8082 weight=1;
}
六个请求3个转发给80,2个转发给81,1个转发给82
upstream server1 {
    server localhost:8080 weight=3;
    server localhost:8081 weight=2 down;
    server localhost:8082 weight=1 backup;
    server localhost:8083 weight=1 max_fails=3 fail_timeout=30s;
}
说明:
- down 表示当前的server暂时不参与负载
- weight 默认为1.weight越大,负载的权重就越大。
- backup: 其它所有的非backup机器down或者忙的时候,请求backup机器。所以这台机器压力会最轻。
- max_fails设置最大失败次数为 3,也就是最多进行 3 次尝试,fail_timeout超时时间为 30秒。max_fails 的默认值为 1,fail_timeout 的默认值是 10s。
- 注意,当upstream中只有一个 server 时,max_fails 和 fail_timeout 参数可能不会起作用。
- weight\backup 不能和 ip_hash 关键字一起使用。
灰度,A/B
- 权重
资料:
proxy 缓存
这篇讲的比较全Web缓存的作用与类型
#要想开启nginx的缓存功能,需要添加此处的两行内容!
#设置Web缓存区名称为cache_one,内存缓存空间大小为500M,缓存的数据超过1天没有被访问就自动清除;访问的缓存数据,硬盘缓存空间大小为30G
proxy_cache_path /usr/local/nginx/proxy_cache_path levels=1:2 keys_zone=cache_one:500m inactive=1d max_size=30g;

#创建缓存的时候可能生成一些临时文件存放的位置
proxy_temp_path /usr/local/nginx/proxy_temp_path;

#对扩展名开启Web缓存,其他文件不缓存
location ~* ^.+\.(ico|gif|jpg|jpeg|png)$ {
    #使用Web缓存区cache_one,已在nginx.conf的缓存配置中命名的。
    proxy_cache cache_one ;
    #对不同HTTP状态码缓存设置不同的缓存时间
    proxy_cache_valid 200 304 12h ;
    proxy_cache_valid 301 302 1m ;
    proxy_cache_valid any 1m ;
    #设置Web缓存的Key值,Nginx根据Key值md5哈希存储缓存,这里根据"域名,URI,
    #参数"组合成Key
    proxy_cache_key $host$uri$is_args$args;

    access_log   off;
    expires      30d;
}
#文件缓存
location ~* ^.+\.(css|js|txt|xml|swf|wav)$ {
    access_log   off;
    expires      24h;
}
#字体缓存
location ~* ^.+\.(eot|ttf|otf|woff|svg)$ {
    access_log   off;
    expires max;
}
#html缓存
location ~* ^.+\.(html|htm)$ {
        expires      1h;
}
注意:proxy_temp_path和proxy_cache_path指定的路径必须在同一磁盘分区,决不能跨区分,因为它们之间是硬链接的关系,避免不通文件系统之间的磁盘IO消耗。配置好这两个参数后使用
~/sbin/nginx -s reload便会自己添加这两个目录
下图:
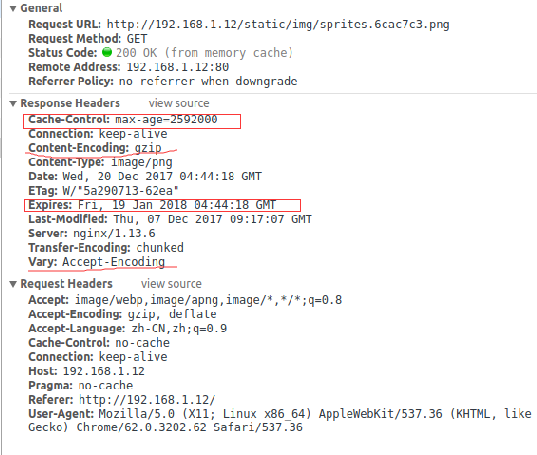
矩形框是缓存相关,直线gzip相关的
gzip
使用gizp压缩并不是没有代价的。在降低带宽的同时也增加了CPU的使用
gzip过程:
- 浏览器发送Http request 给Web服务器, request 中有Accept-Encoding: gzip, deflate。 (告诉服务器, 浏览器支持gzip压缩)
- Web服务器接到request后, 生成原始的Response, 其中有原始的Content-Type和Content-Length。
- Web服务器通过Gzip,来对Response进行编码, 编码后header中有Content-Type和Content-Length(压缩后的大小), 并且增加了Content-Encoding:gzip. 然后把Response发送给浏览器。
- 浏览器接到Response后,根据Content-Encoding:gzip来对Response 进行解码。 获取到原始response后, 然后显示出网页。
http压缩对纯文本可以压缩至原内容的40%左右, 从而节省了40%左右的数据传输。
JPEG这类文件用gzip压缩的不够好。
我设置gzip,和不同压缩等级进行一个比较
- 未使用gzip
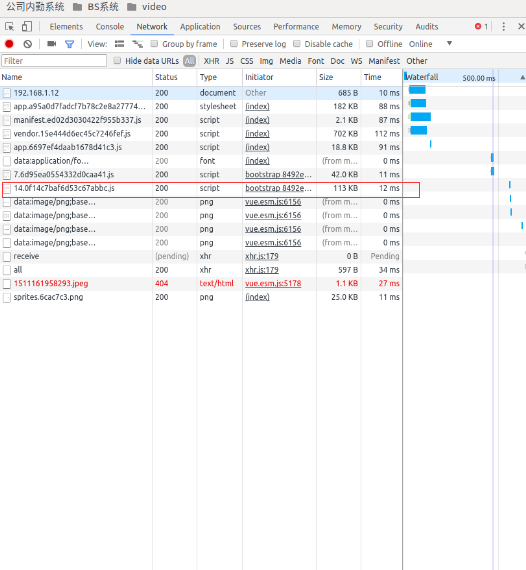
- gzip 等级为2
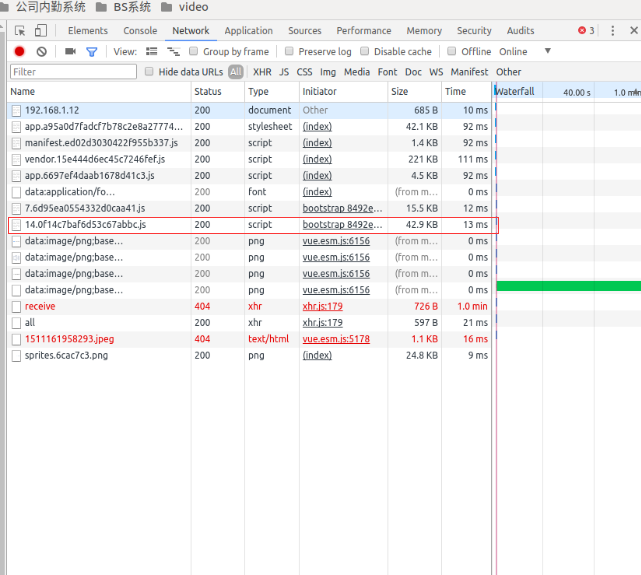
- gzip 等级设为8

总结:
都比较14的javascript文件,上面可以看到两个数据Size,Time的变化;gzip后大小会变小很多,但总时间增加了.增大压缩等级,压缩效果更好,但时间同样增加了很多.gzip要增加cpu压力,所以压缩等级要适当,1或2最合适
https
出现错误:
nginx: [emerg] the "ssl" parameter requires ngx_http_ssl_module in /usr/local/nginx/conf/nginx.conf:37
解决
nginx.conf
http{} 块
server
listen 指令告诉nginx在一个特定的hostname,ip或者tcp端口监听连接。默认,http服务运行在80端口。
server_name 指令可以设置基于域名的虚拟主机,根据请求头部的内容,一个ip的服务器可以配置多个域名。
location 请求的响应内容就会由这个location块中的指令决定
#运行的用户
#user  nobody;
#启动进程,通常设置成和cpu的数量相等
worker_processes  1;

#全局错误日志及PID文件
error_log  /var/ftp/logs/nginx/error.log;
#error_log  logs/error.log  notice;
#error_log  logs/error.log  info;

pid        /run/nginx.pid;


#工作模式及连接数上限
events {
    #epoll是多路复用IO(I/O Multiplexing)中的一种方式,
    #仅用于linux2.6以上内核,可以大大提高nginx的性能
    use   epoll;

    #单个后台worker process进程的最大并发链接数
    worker_connections  1024;

    # 并发总数是 worker_processes 和 worker_connections 的乘积
    # 即 max_clients = worker_processes * worker_connections
    # 在设置了反向代理的情况下,max_clients = worker_processes * worker_connections / 4  为什么
    # 为什么上面反向代理要除以4,应该说是一个经验值
    # 根据以上条件,正常情况下的Nginx Server可以应付的最大连接数为:4 * 8000 = 32000
    # worker_connections 值的设置跟物理内存大小有关
    # 因为并发受IO约束,max_clients的值须小于系统可以打开的最大文件数
    # 而系统可以打开的最大文件数和内存大小成正比,一般1GB内存的机器上可以打开的文件数大约是10万左右
    # 我们来看看360M内存的VPS可以打开的文件句柄数是多少:
    # $ cat /proc/sys/fs/file-max
    # 输出 34336
    # 32000 < 34336,即并发连接总数小于系统可以打开的文件句柄总数,这样就在操作系统可以承受的范围之内
    # 所以,worker_connections 的值需根据 worker_processes 进程数目和系统可以打开的最大文件总数进行适当地进行设置
    # 使得并发总数小于操作系统可以打开的最大文件数目
    # 其实质也就是根据主机的物理CPU和内存进行配置
    # 当然,理论上的并发总数可能会和实际有所偏差,因为主机还有其他的工作进程需要消耗系统资源。
    # ulimit -SHn 65535

}


http {
    #设定mime类型,类型由mime.type文件定义
    include       mime.types;
    default_type  application/octet-stream;

    #设定日志格式
    log_format  main  '$remote_addr - $remote_user [$time_local] "$request" '
                      '$status $body_bytes_sent "$http_referer" '
                      '"$http_user_agent" "$http_x_forwarded_for"';

    #access_log  logs/access.log  main;

    #sendfile 指令指定 nginx 是否调用 sendfile 函数(zero copy 方式)来输出文件,
    #对于普通应用,必须设为 on,
    #如果用来进行下载等应用磁盘IO重负载应用,可设置为 off,
    #以平衡磁盘与网络I/O处理速度,降低系统的uptime.
    sendfile        on;
    #tcp_nopush     on;

    #连接超时时间
    #keepalive_timeout  0;
    keepalive_timeout  65;

    #开启gzip压缩
    #gzip  on;
    #不压缩临界值,大于1K的才压缩,一般不用改
    #gzip_min_length 1k;
    #设置number和size用于压缩的响应缓冲区。默认情况下,缓冲区大小等于一个内存页面。这是4K或8K,取决于平台。
    #gzip_buffers 4 16k;
    #设置压缩响应所需的最小HTTP请求版本。
    #gzip_http_version 1.0;
    #gzip 压缩级别,1-10,数字越大压缩的越好,也越占用CPU时间,后面会有详细说明
    #gzip_comp_level 2;
    #压缩的文件类型
    #gzip_types text/plain application/javascript application/x-javascript text/css application/xml text/javascript application/x-httpd-php image/jpeg image/gif image/png application/font-woff font/ttf font/otf image/svg+xml;
    #如果指令gzip, gzip_static或gunzip 处于活动状态, 则启用或禁用插入“Vary:Accept-Encoding”响应标头字段 。
    #gzip_vary on;
    #禁用“User-Agent”标头字段与任何指定的正则表达式匹配的请求响应的gzip。禁用IE 6 gzip
    #gzip_disable "MSIE [1-6]\.";
    #根据请求和响应,启用或禁用对代理请求的响应的gzip。请求代理的事实由“Via”请求头字段的存在决定。
    #gzip_proxied

    #设定请求缓冲
    client_header_buffer_size    128k;
    large_client_header_buffers  4 128k;

   #设定实际的服务器列表
    upstream zp_server1{
        server localhost:8080;
        #keepalive 2000;
    }

    #设定虚拟主机配置
    server {
        #侦听80端口
        listen       80;
        #访问
        server_name  192.168.1.12;

        #定义服务器的默认网站根目录位置
        #root html;

        #charset koi8-r;

        #设定本虚拟主机的访问日志
        #access_log  logs/host.access.log  main;

        #默认请求
        location / {
            #定义首页索引文件的名称
            root   html;
            index  index.html index.htm;
        }
        #代理
        location /oa/ {
            proxy_pass http://zp_server1;
            #proxy_set_header Host $host:$server_port;
        }

        location /resources/ {
            proxy_pass http://zp_server1;
        }
        #定义错误提示页面
        #error_page  404              /404.html;

        # redirect server error pages to the static page /50x.html
        #
        error_page   500 502 503 504  /50x.html;
        location = /50x.html {
            root   html;
        }

        # proxy the PHP scripts to Apache listening on 127.0.0.1:80
        #
        #location ~ \.php$ {
        #    proxy_pass   http://127.0.0.1;
        #}

        # pass the PHP scripts to FastCGI server listening on 127.0.0.1:9000
        #PHP 脚本请求全部转发到 FastCGI处理. 使用FastCGI默认配置.
        #location ~ \.php$ {
        #    root           html;
        #    fastcgi_pass   127.0.0.1:9000;
        #    fastcgi_index  index.php;
        #    fastcgi_param  SCRIPT_FILENAME  /scripts$fastcgi_script_name;
        #    include        fastcgi_params;
        #}

        # deny access to .htaccess files, if Apache's document root
        #禁止访问 .htxxx 文件
        #location ~ /\.ht {
        #    deny  all;
        #}

        #静态文件,nginx自己处理
        location ~ ^/(images|javascript|js|css|flash|media|static)/ {

         #过期30天,静态文件不怎么更新,过期可以设大一点,
         #如果频繁更新,则可以设置得小一点。
              expires 30d;
         }
    }


    # another virtual host using mix of IP-, name-, and port-based configuration
    #
    #server {
    #    listen       8000;
    #    listen       somename:8080;
    #    server_name  somename  alias  another.alias;

    #    location / {
    #        root   html;
    #        index  index.html index.htm;
    #    }
    #}


    # HTTPS server
    #
    #server {
    #    listen       443 ssl;
    #    server_name  localhost;

    #    ssl_certificate      cert.pem;
    #    ssl_certificate_key  cert.key;

    #    ssl_session_cache    shared:SSL:1m;
    #    ssl_session_timeout  5m;

    #    ssl_ciphers  HIGH:!aNULL:!MD5;
    #    ssl_prefer_server_ciphers  on;

    #    location / {
    #        root   html;
    #        index  index.html index.htm;
    #    }
    #}

}
备份:
#user  nobody;
worker_processes  1;

error_log  /var/ftp/logs/nginx/error.log;
#error_log  logs/error.log  notice;
#error_log  logs/error.log  info;

pid        /run/nginx.pid;


events {
    worker_connections  1024;
}


http {
    include       mime.types;
    default_type  application/octet-stream;

    #log_format  main  '$remote_addr - $remote_user [$time_local] "$request" '
    #                  '$status $body_bytes_sent "$http_referer" '
    #                  '"$http_user_agent" "$http_x_forwarded_for"';

    #access_log  logs/access.log  main;

    sendfile        on;
    #tcp_nopush     on;

    #keepalive_timeout  0;
    keepalive_timeout  65;

    gzip  on;
    #不压缩临界值,大于1K的才压缩,一般不用改
    gzip_min_length 1k;
    #设置number和size用于压缩的响应缓冲区。默认情况下,缓冲区大小等于一个内存页面。这是4K或8K,取决于平台。
    gzip_buffers 4 16k;
    #设置压缩响应所需的最小HTTP请求版本。
    gzip_http_version 1.0;
    #压缩级别,1-10
    gzip_comp_level 2;
    #压缩的文件类型
    gzip_types text/plain application/javascript application/x-javascript text/css application/xml text/javascript application/x-httpd-php image/jpeg image/gif image/png application/font-woff;
    #如果指令gzip, gzip_static或gunzip 处于活动状态, 则启用或禁用插入“Vary:Accept-Encoding”响应标头字段 。
    gzip_vary on;
    #禁用“User-Agent”标头字段与任何指定的正则表达式匹配的请求响应的gzip。
    gzip_disable "MSIE [1-6]\.";

    #要想开启nginx的缓存功能,需要添加此处的两行内容!
#设置Web缓存区名称为cache_one,内存缓存空间大小为500M,缓存的数据超过1天没有被访问就自动清除;访问的缓存数据,硬盘缓存空间大小为5G
    proxy_cache_path /usr/local/nginx/proxy_cache_path levels=1:2 keys_zone=cache_one:500m inactive=1d max_size=5g;

#创建缓存的时候可能生成一些临时文件存放的位置
    proxy_temp_path /usr/local/nginx/proxy_temp_path;

    proxy_connect_timeout 5;
    proxy_read_timeout 60;
    proxy_send_timeout 5;
    proxy_buffer_size 16k;
    proxy_buffers 4 64k;
    proxy_busy_buffers_size 128k;
    proxy_temp_file_write_size 128k;

   #设定实际的服务器列表
    upstream zp_server1{
        server localhost:8080;
        #keepalive 2000;
    }
    server {
        listen       80;
        server_name  192.168.1.12;

        #charset koi8-r;

        #access_log  logs/host.access.log  main;

        location / {
            root   html;
            index  index.html index.htm;
        }

    location /oa/ {
        proxy_pass http://zp_server1;
        #proxy_set_header Host $host:$server_port;
    }

    location /resources/ {
        proxy_pass http://zp_server1;
    }

    #图片缓存
    location ~* ^.+\.(ico|gif|jpg|jpeg|png)$ {
            access_log   on;
            expires      30d;
    }
    #文件缓存
    location ~* ^.+\.(css|js|txt|xml|swf|wav)$ {
        access_log   on;
        expires      24h;
        proxy_redirect off;
              proxy_set_header Host $host;
              proxy_cache cache_one;
              proxy_cache_valid 200 302 1h;
              proxy_cache_valid 301 1d;
              proxy_cache_valid any 1m;
         add_header X-Cache $upstream_cache_status;
            proxy_cache_key    $uri$is_args$args;
    }
    #html缓存
    location ~* ^.+\.(html|htm)$ {
        access_log on;
            expires 1h;
    }
        #error_page  404              /404.html;

        # redirect server error pages to the static page /50x.html
        #
        error_page   500 502 503 504  /50x.html;
        location = /50x.html {
            root   html;
        }

        # proxy the PHP scripts to Apache listening on 127.0.0.1:80
        #
        #location ~ \.php$ {
        #    proxy_pass   http://127.0.0.1;
        #}

        # pass the PHP scripts to FastCGI server listening on 127.0.0.1:9000
        #
        #location ~ \.php$ {
        #    root           html;
        #    fastcgi_pass   127.0.0.1:9000;
        #    fastcgi_index  index.php;
        #    fastcgi_param  SCRIPT_FILENAME  /scripts$fastcgi_script_name;
        #    include        fastcgi_params;
        #}

        # deny access to .htaccess files, if Apache's document root
        # concurs with nginx's one
        #
        #location ~ /\.ht {
        #    deny  all;
        #}
    }


    # another virtual host using mix of IP-, name-, and port-based configuration
    #
    #server {
    #    listen       8000;
    #    listen       somename:8080;
    #    server_name  somename  alias  another.alias;

    #    location / {
    #        root   html;
    #        index  index.html index.htm;
    #    }
    #}


    # HTTPS server

    server {
        listen       443 ssl;
        server_name  localhost;

        ssl_certificate      /usr/local/nginx/conf/server.crt;
        ssl_certificate_key  /usr/local/nginx/conf/server.key;

        ssl_session_cache    shared:SSL:1m;
        ssl_session_timeout  5m;

        ssl_ciphers  HIGH:!aNULL:!MD5;
        ssl_prefer_server_ciphers  on;

        location / {
            root   html;
            index  index.html index.htm;
        }
    }

}